
Installing Slackware-current using QEMU
This is my basic guide for installing Slackware-current (x86_64) in a virtual environment using plain QEMU, covering various installation methods. I am using QEMU 10.2.2 (released March 2026) with the default user networking (SLIRP) and the default legacy BIOS.
QEMU was added to Slackware-current as a standard package on 17 March, 2026 (Saint Patrick’s Day). It is built with a number of the most useful dependencies for common use cases (in particular, libslirp for user networking). The target architectures provided include 32 and 64-bit versions of x86, ARM, riscv, loongarch and sparc.
Note that in order to run QEMU as a regular user, you must belong to the kvm group.
Preparing a QEMU VM image
To create a 25 GB QEMU VM image:
qemu-img create -f qcow2 slackware64.img 25G
A full installation of Slackware-current takes around 30 GB. Even my preferred "minimal" XFCE-only installation takes about 17 GB. By my calculations, the top 25 or so packages accounted for about 10 GB and the remaining 1200+ packages accounted for the rest. When installing to a VM, I generally exclude the following package sets:
- E (emacs)
- F (FAQs and Howtos)
- K (Kernel source)
- KDE
- T (texlive)
- TCL
With these package sets excluded, the installation takes about 17 GB so, depending on your intended use for the VM, I would recommend a minimum QEMU image size of 20 GB. If you intend to use a swap partition, you will need to allocate space for that as well. If you intend to do anything useful, 25+ GB is probably a better idea.
Installing from an ISO image
The simplest way to install Slackware in QEMU is using a DVD ISO image. However Slackware-current does not have an official DVD ISO image as it is under continuous development. You can either download an unofficial community-maintained ISO image or build your own ISO from a local copy of the Slackware-current repository.
Downloading a current ISO
Slackware-current does not have an official DVD ISO image. Eric Hameleers (aka AlienBOB) maintains a frequently updated slackware64-current-install-dvd.iso image that can be downloaded from various locations:
These ISO images exclude the non-essential testing/, source/, extra/,
and usb-and-pxe-installers/ directories which reduces the size of the
download to around 4.5 GB. For a complete ISO image, the total size can vary
depending on what is currently included in the testing/ directory such as
alternate packages for llvm or rust.
There is also a slackware64-current-mini-install.iso image (approx. 200 MB) which includes the Slackware installer only without the packages. This can be used for network-based installations instead of the usbboot.img method (see below).
Building your own current ISO
If you keep your own local mirror of the Slackware-current repository (like I
do) you can generate your own ISO image using the xorriso command provided
in the repository’s /isolinux/README.TXT file. This command includes
everything in the ISO except the source/ directory (which I don’t mirror
anyway) and produces (at the time of writing) a 5.7 GB ISO image. You can
reduce the ISO size by about 1 GB by excluding the testing/, extra/ and
usb-and-pxe-installers/ directories.
cd /path/to/slackware64-current

xorriso -as mkisofs \
    -iso-level 3 \
    -full-iso9660-filenames \
    -R -J -A "Slackware Install" \
    -hide-rr-moved \
    -v -d -N \
    -eltorito-boot isolinux/isolinux.bin \
    -eltorito-catalog isolinux/boot.cat \
    -no-emul-boot -boot-load-size 4 -boot-info-table \
    -isohybrid-mbr /usr/share/syslinux/isohdpfx.bin \
    -eltorito-alt-boot \
    -e isolinux/efiboot.img \
    -no-emul-boot -isohybrid-gpt-basdat \
    -m 'source/' -m 'extra/' -m 'testing/' -m 'usb-and-pxe-installers/' \
    -volid "SlackDVD" \
    -output /tmp/slackware64-dvd.iso \
    .
Adjust the -output option to your preferred location for the ISO image.
Note that if you don’t move the ISO image from this output location and you
re-run the command after updating your current repository with recent changes,
xorriso will update the ISO image with these changes rather than rebuilding
from scratch.
Booting QEMU from the ISO
qemu-system-x86_64 -enable-kvm -machine q35 -cpu host -m 2G \
    -hda slackware64.img \
    -cdrom slackware64-dvd.iso \
    -boot once=d
This will run the Slackware installer just as if you had booted from the physical DVD drive. All the packages to be installed are available on the ISO image.
The slackware64.img image will appear as /dev/sda. The emulated
environment uses legacy BIOS, not UEFI, so you need to either create a DOS
partition table or, if you use GPT, remember to create a small "BIOS boot"
partition in which the Grub bootloader can be installed.
No network is required during this ISO-based installation but if you want to configure the network with static settings using QEMU’s default user networking, the values are:
IP address |
10.0.2.15 |
Gateway |
10.0.2.2 |
DNS server |
10.0.2.3 |
See the QEMU wiki for the features and limitations of QEMU user networking.
After the installation is complete, you need to halt the VM and relaunch it
without the -cdrom and -boot options.
Running the USB installer
Slackware provides a boot image (/usb-and-pxe-installers/usbboot.img) that
can be written to a bootable USB stick in order to run the installer. We can
also use this image to run the installer in QEMU without having to use an ISO
image. This is helpful when we have a local copy of the Slackware-current
repository as we don’t have to download or build an ISO image. Instead we can
use one of the alternate methods supported by the "SOURCE MEDIA SELECTION"
step in the Slackware installer for obtaining packages such as from a
Samba share or a pre-mounted directory.
To boot the usbboot.img image you can specify it as a disk
(-hdb /path/to/usbboot.img) however, QEMU will warn about having to guess
that is uses the "raw" format. To explicitly provide the image format, you
have to use the -drive option:
qemu-system-x86_64 -enable-kvm -machine q35 -cpu host -m 2G \
    -hda slackware64.img \
    -drive file=/path/to/usbboot.img,format=raw,index=1,media=disk \
    -boot once=c,menu=on
This will make slackware64.img, to which we are installing, appear as
/dev/sda and usbboot.img appear as /dev/sdb (index=1). As the blank
image file appears first, QEMU will normally try to boot it and fail. In
order to boot from the usbboot.img we include the "menu=on" option to the
-boot parameter that lets us press <ESC> at boot and choose to boot from
the 2nd QEMU disk.
Installing from a Samba share
The QEMU user networking provides an optional Samba server at the 10.0.2.4 IP
address. To enable it you need to explicitly configure user networking with
-device and -netdev parameters and specify the Samba share using the
"smb=/path/to/repo" option. The shared directory specified using the "smb"
option will then appear as the Samba share //10.0.2.4/qemu.
REPO=/path/to/slackware64-current

qemu-system-x86_64 -enable-kvm -machine q35 -cpu host -m 2G \
    -hda slackware64.img \
    -drive file=$REPO/usb-and-pxe-installers/usbboot.img,format=raw,index=1,media=disk \
    -boot once=c,menu=on \
    -device e1000,netdev=net0 \
    -netdev user,id=net0,smb=$REPO
Now when running Slackware setup, at the "SOURCE MEDIA SELECTION"
step you can select "Install from Samba share". If you have not already
configured your network, you will be prompted for the QEMU network settings.
IP Address |
10.0.2.15 |
Netmask |
255.255.255.0 |
Gateway Address |
10.0.2.2 |
SMB Share Address |
//10.0.2.4/qemu |
Source Directory |
/slackware64 |
If successful, the "MOUNT RESULT" screen should report "A Slackware package tree was found!". You can then proceed with the "PACKAGE SERIES SELECTION" step of the installation.
While QEMU user networking does provide a DHCP server, the Slackware installer
doesn’t appear to detect it, hence requires the network settings to be
manually entered. Alternatively, you can run dhcpcd -L eth0 yourself before
starting the setup process. This will configure the IP address (10.0.2.15),
gateway (10.0.2.2) and DNS server (10.0.2.3). Now when you choose "Install
from Samba share", you just have to enter the share address (//10.0.2.4/qemu)
and directory (/slackware64).
Another option is to manually mount the share yourself and choose the "Install from a pre-mounted directory" option.
# Configure the network
dhcpcd -L eth0
# Create a unique mount point
mkdir /slackrepo
# Mount the Samba share
mount -t cifs //10.0.2.4/qemu /slackrepo
In the above example, when prompted for the directory containing the package set subdirectories, the path would be "/slackrepo/slackware64"
Installing from a 9p mount
QEMU provides the 9p virtual filesystem which allows you to expose a directory on the host to the guest VM. This provides another method of accessing a local copy of the Slackware-current repository in the installer, using the "Install from a pre-mounted directory" option. Unlike the Samba share method, 9p does not require any network configuration but it does require you to run QEMU as root (see WARNING below).
REPO=/path/to/slackware64-current

qemu-system-x86_64 -enable-kvm -machine q35 -cpu host -m 2G \
    -hda slackware64.img \
    -drive file=$REPO/usb-and-pxe-installers/usbboot.img,format=raw,index=1,media=disk \
    -boot once=c,menu=on \
    -virtfs local,path=$REPO,readonly=on,security_model=passthrough,\
        id=slackware64,mount_tag=myrepo
The "mount_tag" option specifies the name of the "device" (myrepo) we can mount in the installer. The value of the "id" option doesn’t really matter.
mkdir /slackrepo
mount -t 9p -o trans=virtio,ro myrepo /slackrepo -oversion=9p2000.L
You can now run setup and, at the "SOURCE MEDIA SELECTION" step, choose
"Install from a pre-mounted directory" and enter "/slackrepo/slackware64" as
the location of the package sets.
|
Warning
|
In order for the Slackware installer to work with a 9p mount of the repository, you need to use "security_model=passthrough" (which is strongly discouraged) and run QEMU as root. This is because if you run using the recommended "security_model=mapped-xattr" option, symlinks are treated as empty files and that breaks the installer somewhere. When run as root using "security_model=passthrough" symlinks appear as working symlinks. To be safe(r), I specify the "readonly=on" option and mount the 9p device read-only. |
Installing from a virtual FAT drive
Short answer: You can’t.
Another way to expose a directory on the host to the guest is using QEMU’s
"Virtual FAT disk images". The
documentation
suggests you can still use the parameter like -hdc fat:/path/to/directory
but this no longer works (complains about having to probe the format).
In theory, the following invocation would expose the /path/to/repo directory
as the third virtual disk (/dev/sdc1) which you could then mount and use as
a source for the packages.
qemu-system-x86_64 -enable-kvm -machine q35 -cpu host -m 2G \
    -hda slackware64.img \
    -drive file=/path/to/usbboot.img,format=raw,index=1,media=disk \
    -drive file=fat:rw:/path/to/repo,format=raw,index=2 \
    -boot once=c,menu=on
However, this too will fail with the error message that "Directory does not fit in FAT16 (capacity 516.06 MB)". So essentially the Slackware-current package repository is too large to appear as a virtual FAT disk in QEMU.
You could still use this method in conjunction with one of the other methods discussed above to provide access to a directory of custom tagfiles in order to use the tagpath prompting mode.
|
Note
|
In QEMU 10.2.2, you have to specify the directory is read/write using
file=fat:rw:/path/to/dir. If you use file=fat:/path/to/dir then QEMU will
fail to start with the error "Block node is read-only".
|
Installing from the network
With QEMU user networking, you can use the conventional Slackware network installation methods in "SOURCE MEDIA SELECTION":
- Install from NFS (Network File System)
- Install from FTP/HTTP server
On my home network I have a NAS on which I keep my local mirror of various Slackware repositories, including "slackware64-current", and these repositories are accessible via an NFS mount or via FTP.
For any network-based installation method in QEMU, I found it easiest to
configure the network manually via DHCP (run dhcpcd -L eth0) before running
the setup tool.
For the FTP method, it just works as expected, but is considerably slower than other methods. I have never used or tested the HTTP method.
For the NFS method, it requires that your NFS exports are marked with the insecure flag so that connections using non-reserved ports (above 1024) are accepted. I believe this is because the SLIRP-based user networking creates a NAT network so the NFS server sees connections as coming from the host using random high number ports.
Running the PXE installer
A third option for booting the Slackware installer in QEMU is using network
PXE boot. This is directly supported in QEMU’s user networking using the
"tftp" and "bootfile" options to the -netdev parameter.
qemu-system-x86_64 -enable-kvm -machine q35 -cpu host -m 2G \
    -hda slackware64.img \
    -device e1000,netdev=net0 \
    -netdev user,id=net0,tftp=/path/to/tftpboot,bootfile=/slackware64-current/pxelinux.0 \
    -boot once=n
The -boot once=n parameter tells QEMU to attempt to boot from the first
network device.
Eric Hameleers' README_PXE.TXT documentation in the Slackware repository’s
usb-and-pxe-installers/ directory provides comprehensive instructions on how
to setup a PXE boot server from scratch. The relevant part we need in order
to make QEMU the PXELinux server is found in the "PXELinux configuration"
section. Essentially we need to populate a directory with the necessary
components of the Slackware installer, plus the magic pxelinux.0 bootloader,
and make this directory the root of the tree served by QEMU’s built-in TFTP
server.
I shall condense the README_PXE.TXT instructions as a dodgy shell script. Edit the paths as appropriate for your setup.
#!/bin/bash -

# CHANGE ME: Path to the tftpboot root directory we are populating.
TFTPBOOT=/path/to/tftpboot

# CHANGE ME: Path to our local copy of the slackware64-current repository.
SLACKREPO=/path/to/slackware64-current

# Extract the repository name (slackware64-current) from the repo path to make
# a sub-directory of the TFTP root directory.
#   /path/to/tftpboot/slackware64-current
TARGET=$TFTPBOOT/${SLACKREPO##*/}

# Creates the directories:
#   /path/to/tftpboot/slackware64-current
#   /path/to/tftpboot/slackware64-current/pxelinux.cfg
mkdir -p $TARGET/pxelinux.cfg

# Add the PXE bootloader.
cp /usr/share/syslinux/pxelinux.0 $TARGET

# Add the Slackware installer's message.txt and f2.txt prompt files.
cp $SLACKREPO/isolinux/{message,f2}.txt $TARGET

# Add the Slackware installer's initrd.
cp $SLACKREPO/isolinux/initrd.img $TARGET

# Add the PXE config file from usb-and-pxe-installers/
cp $SLACKREPO/usb-and-pxe-installers/pxelinux.cfg_default $TARGET/pxelinux.cfg/default

# And... add the kernels.
cp -a $SLACKREPO/kernels $TARGET
|
Note
|
The pxelinux (and isolinux) installer still offers three kernel
options, as defined in the pxelinux.cfg/default file. These options are
labelled as generic.s (the default), kms.s and speakup.s. These days
there is actually only one kernel — generic.s — that is referenced in
pxelinux.cfg/default. The only difference between the options is that the
kms.s option doesn’t pass the "nomodeset" kernel parameter which means you
get a larger console in QEMU.
|
The directory structure we end up with looks like:
/path/to/tftpboot/slackware64-current/
    pxelinux.0
    pxelinux.cfg/
        default
    message.txt
    f2.txt
    initrd.img
    kernels/
        generic.s/
            System.map.gz
            bzImage
            config
        speakup.s/
        memtest/
            memtest
Based on this structure, the relevant options for our QEMU invocation’s
-netdev parameter are "tftp=/path/to/tftpboot" (specifies the root of the
TFTP server) and "bootfile=/slackware64-current/pxelinux.0" (specifies the
relative path to the PXE bootloader).
Of course, all this just boots the installer with a blank QEMU image
(slackware64.img) as /dev/sda. We still need to obtain the Slackware
packages to install. All the same options discussed when using
usbboot.img still apply for PXE boot. Indeed you can combine
the -netdev "tftp/bootfile" options with the "smb" option to both PXE boot
the installer from QEMU’s TFTP server and install the packages from QEMU’s SMB
server.
qemu-system-x86_64 -enable-kvm -machine q35 -cpu host -m 2G \
    -hda slackware64.img \
    -device e1000,netdev=net0 \
    -netdev user,id=net0,\
        tftp=/path/to/tftpboot,\
        bootfile=/slackware64-current/pxelinux.0,\
        smb=/path/to/slackware64-current \
    -boot once=n
Installing Slackware in EFI-mode
By default QEMU uses a "legacy" BIOS (SeaBIOS) which is simple and effective. If you want to simulate an EFI system, it is a little more complicated. In general, if you just want a Slackware VM, stick to the legacy BIOS. I only use the EFI firmware to play with the Slackware installer in EFI-mode.
In the past, running QEMU with EFI firmware involved installing the
edk2-ovmf (Open
Virtual Machine Firmware) package from SlackBuilds.org and presenting the
appropriate firmware blobs to QEMU as pflash (parallel flash) devices. This
approach still works (and may be necessary for more recent or exotic setups)
but it appears that back in early 2019 QEMU started bundling the edk2-ovmf
firmware binaries itself, which can be found in /usr/share/qemu/.
The EFI firmware comes in two parts: the code part, which I presume is the
UEFI implementation, and the vars part, which I presume is where the
modifiable efivars values are stored. When installing x86_64 Slackware,
you need copies of the following firmware files:
-
/usr/share/qemu/edk2-x86_64-code.fd -
/usr/share/qemu/edk2-i386-vars.fd
(There is no edk2-x86_64-vars.fd file — it appears the i386 version works
for both 32 and 64-bit x86 VMs.)
Unlike the legacy BIOS approach, with EFI you must create a separate copy of
the EFI firmware files for each VM you are running because you will be making
changes to the VM’s firmware, specifically the device boot order. I am not
sure that the "code" firmware file is changed but it is safest to work with a
copy. (I set the readonly=on parameter for the "code" firmware drive but I
have no idea whether it has any effect.)
To boot the Slackware-current installer in EFI mode, first copy the
edk2-x86_64-code.fd and edk2-i386-vars.fd files from /usr/share/qemu/ to
the directory containing the QEMU image that we will install to (say,
slackware64.img). I suggest creating a fresh copy of the EFI firmware
files everytime you do a re-install and these firmware files should always
travel with the VM image.
qemu-system-x86_64 -enable-kvm -cpu host -machine q35 -m 2G \
    -drive file=slackware64.img,format=qcow2,index=0,media=disk \
    -drive file=/path/to/usbboot.img,format=raw,index=1,media=disk \
    -drive if=pflash,format=raw,unit=0,file=edk2-x86_64-code.fd,readonly=on \
    -drive if=pflash,format=raw,unit=1,file=edk2-i386-vars.fd \
    -device e1000,netdev=net0 \
    -netdev user,id=net0,smb=/path/to/slackware64-current
The first -drive item could be written as -hda slackware64.img.
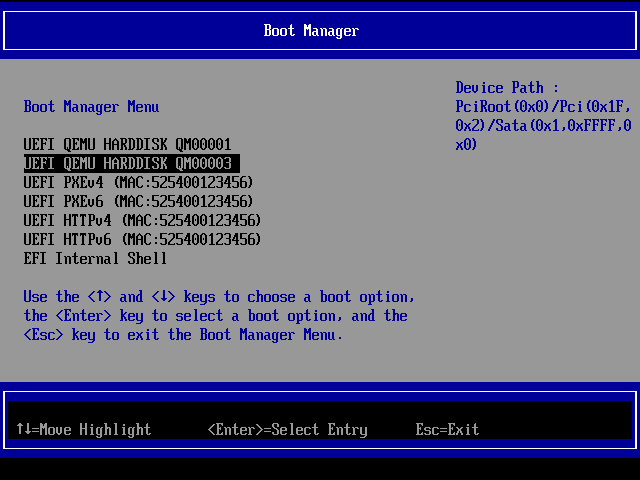
If everything works as expected, the firmware will detect the EFI partition on
the usbboot.img device and show the installer’s GRUB menu. If that’s not
the case, you can run QEMU with -boot once=c,menu=on instead and press
<ESC> on the splash screen to enter the EFI menu:
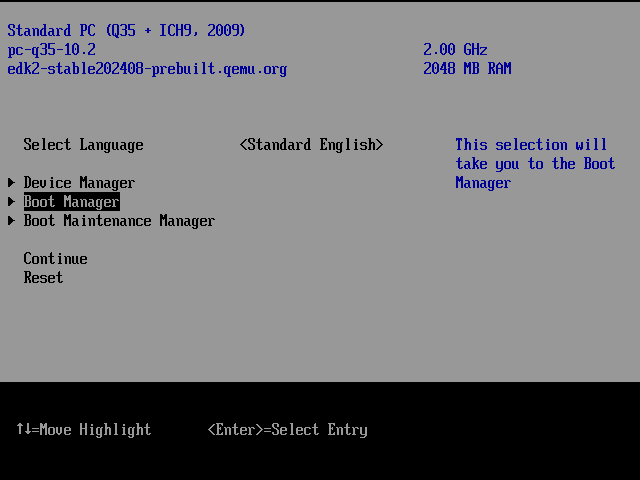
Go to the "Boot Manager" section and choose the second "UEFI QEMU HARDDISK"
corresponding to the usbboot.img drive to boot the installer.
Things to remember about an EFI install:
-
Format the install drive as GPT using
gdisk,cgdiskorcfdisk(easiest). - Create an "EFI System Partition" (type=EF00) of at least 100MB.
- Partition the remainder of the drive according to your preferences.
-
Manually configure the network using
dhcpcd -L eth0. -
Proceed with running
setupand installing from a Samba share. -
Use the installer’s
elilosetup or manually configuregrublater.
After installation is complete, whenever you run the VM in future, you need to continue to include the EFI code/vars files that correspond to the VM image.
qemu-system-x86_64 -enable-kvm -cpu host -machine q35 -m 2G \
    -hda slackware64.img \
    -drive if=pflash,format=raw,unit=0,file=edk2-x86_64-code.fd,readonly=on \
    -drive if=pflash,format=raw,unit=1,file=edk2-i386-vars.fd
|
Note
|
One issue I have had with the Slackware VM in EFI-mode is that the hardware
clock ( select() to /dev/rtc to wait for clock tick timed out This is not an issue when using the legacy BIOS so I presume it is something missing from the EFI firmware. I tested using the EFI firmware included in the QEMU package and with the edk2-ovmf firmware from the SlackBuild package — both failed. You can work around it using |