Slackware on the Asus Eee PC 701
The Asus Eee PC 701 is one of the original netbook computers, released in 2007. Can you install and run Slackware Linux on the Eee PC 701 as of 2025? Yes, it can be done. Does it make sense? Not really, but that’s fine. Some of the material presented here might be useful for installing on other 32-bit hardware or on space-constrained systems.
My Eee PC 701 has an Intel Celeron M CPU (single-core, 32-bit i686, 900MHz), 512MB RAM and a 4GB SiliconMotion SM223AC SSD.
At the time of writing (April 2025) Slackware-current has been in development
for a little over 3 years. (Slackware 15.0 was released in Feburary 2022.)
The current kernel branch is 6.12 with kernel packages for the 6.14 branch
provided in testing/. There is the possibility this will be the last
release of Slackware with a 32-bit version.
Bare metal 32-bit will be essentially dead with linux-6.15 anyway. ➚
LinuxQuestions.org
With only 4GB of internal storage to work with on the Eee PC, a full install
is obviously not possible. According to Slackware’s 32-bit PACKAGES.TXT, the
total size of all packages when uncompressed (installed) is just under 20GB.
(For 64-bit Slackware, it is 21.5GB.) Package series can be excluded when
installing to reduce the install size (eg., exclude KDE, kernel source, tetex,
etc.) however even just installing the a package series on its own (129
packages) is 2GB. Indeed the kernel-firmware package on its own is 1.4GB
uncompressed.
The menu or expert installation methods could be used, which will prompt
to add or skip for every package. Twenty years ago I can remember using
this method but today, with over 1700 packages to review, it’s not really
viable.
Tagfiles
To do an automatic installation of a user-controlled set of packages, we can
use the tagfile method. For packages to be included,
set their tag to ADD and for everything else, set it to SKP. Make sure
not to have any REC or OPT tags otherwise the installer will prompt to
choose whether to include the package. With only ADD and SKP tags, the
package installation step will be non-interactive.
|
Warning
|
Slackware doesn’t do dependency management. In general, a full install is required in order to guarantee a working system. If critical packages are excluded during the install, either manually or via a tagfile, the resulting system will be broken. |
The Slackware installer has two methods of using tagfiles:
- tagpath
-
Place the modified copy of the package series tagfiles somewhere accessible to the installer, such as on a separate USB stick.
- custom
-
Copy each modified tagfile with a custom suffix into the installation media’s corresponding package series directory, alongside the existing tagfile.
The tagpath method would be used if you are installing from an ISO image
(DVD) where you cannot modify the installation media. If using the USB
installer (as we do with the Eee PC) then either method can be will work.
When we choose to source packages from a USB stick at the "SOURCE MEDIA
SELECTION" step of the installation process, the USB stick will be mounted at
/usb-stick so is accessible via the tagpath method.
|
Note
|
The slackpkg package management tool has the concept of "templates"
which allows you to install or remove a list of packages in a template file.
This could be used for a post-installation configuration step but you still
need to start with a working installation. Tagfiles work with the Slackware
installer so allow you to start with only the packages you want.
|
To work with tagfiles, I ended up writing a bunch of scripts to make life easier.
get_tagfiles.sh-
Create a copy of a tagfile set from a Slackware repository via rsync, ftp or http.
prepare_tagfiles.sh-
Make a tagfile set suitable for a non-interactive install by replacing
RECandOPTtags withADDandSKPrespectively. update_tagfiles.sh-
Update a modified tagfile set with package changes from Slackware-current by adding new packages and/or removing obsolete packages.
calc_install_size.sh-
Using
PACKAGES.TXT, calculate the estimated installation size of a tagfile set. template_to_tagfile.sh-
Apply a
slackpkgtemplate to a tagfile set so that only packages listed in the template are added. copy_custom.sh-
Copy the tagfiles from a tagfile set to the installation media’s packages directory with a given suffix. Eg., ".eeepc".
stfe.sh-
The Slackware Tagfile Editor — a dialog-based tool for editing a tagfile set.
These tagfile scripts can be found on sourcehut at https://git.sr.ht/~gslewis/stfm.
git clone https://git.sr.ht/~gslewis/stfm
A minimal Slackware
What is a minimal working Slackware installation? A perennial question, discussed occasionally on LinuxQuestions.org such as here and here. Also of interest is nobodino’s slackware-mini package list which starts from the bare minimum of 24 packages to get a bootable system and progressively adds packages to add features.
For the Eee PC, as a starting point, I took the LXC Slackware template
(/usr/share/lxc/templates/lxc-slackware) which creates a slackpkg template
for a minimal set of 82 packages (search for "minimal-lxc.template"). As the
comment in the template suggests, this is itself based on Vincent Batts'
very_minimal_current.list
of packages for Slackware 13.37.
|
Note
|
The minimal-lxc.template actually lists 81 proper packages because it
includes the old aaa_elflibs package (used up to Slackware 14.2) and the new
aaa_libraries package (used since 15.0). Not sure if this is intentional
but we can exclude the aaa_elflibs package.
|
As the LXC template is intended to set up Slackware in a container
environment, it does not include the kernel-generic package or other
packages related to booting on bare metal.
While the Eee PC is pre-UEFI and, in theory, should be able to use lilo as
the bootloader, in previous attempts I was unable to use it when the root
partition was formatted as btrfs or f2fs. The plan is to use btrfs with
compression enabled to get more use out of our 4GB SSD. Therefore we use
grub which has now become the standard Slackware bootloader anyway.
The additional packages are:
-
kernel-generic -
mkinitrd -
binutils— required bymkinitrd. -
cpio— required bymkinitrd. -
grub -
btrfs-progs -
zstd
This gives us a total of 88 packages and an install size of 766MB, producing a
useable console-based system with wired networking. I probably don’t need to
include the zstd package (used for btrfs compression) because libzstd is
included in the base libraries provided via the aaa_libaries package, but it
is only 1.8MB so it doesn’t hurt.
For my initial quality of life, I also added the following packages:
-
inxi(1.5M) — for diagnostics such as checking battery levels. -
pciutils(460K) — forlspci. -
hdparm(210K) -
htop(460K) -
tree(170K) -
vim(45M) — my preferred editor. -
libsodium(760K) — required byvim. -
ruby(60M) — required byvim. -
file(2.3M) — provideslibmagicrequired bymore. -
lzlib(150K) — required bymore. -
lzo(440K) — required by somebtrfstools.
This brings the total to 99 packages and increases the install size to 876MB,
the bulk of the increase due to vim and its dependency ruby.
Another consideration is the glibc-i18n package (250MB installed) which
provides all the locale files and internationalisation resources. By default,
Slackware sets LANG=en_US.UTF-8 in /etc/profile.d/lang.sh which requires
the glibc-i18n package to be effective. Without it, things like perl
(used by inxi) will complain with "Setting locale failed". There are two
options: install the the glibc-i18n package, or set LANG=C. Down the
track, another option might be to trim unused locales from the glibc-i18n
package.
If the glibc-i18n package is included as is, that brings the install to 100
packages and a size of 1.1GB.
The final list of packages used is here — minimal.template
Preparing the installation media
Step 1 - Create the USB installer
Create an all-in-one USB installer that contains the 32-bit Slackware
packages to be installed. This is done using the
usb-and-pxe-installers/usbimg2disk.sh script from the Slackware
repository. For 32-bit Slackware, this takes up about 5GB on the USB drive.
cd slackware-current/usb-and-pxe-installers/
sh usbimg2disk.sh -f -i usbboot.img -o /dev/sdX -L SLACK32 -s $(realpath ..)
The script must be run as root. The -f option (format) means the USB drive
will be wiped. Change /dev/sdX to the device corresponding to your
plugged-in USB drive. You get a couple of chances to confirm the target
device is correct before proceeding. As the entire Slackware package set is
being copied, creating the USB installer will take a while.
|
Note
|
The -s or --slackdir option is the path to the root of the Slackware
repository which, if we are in the usb-and-pxe-installers/ directory is the
parent directory. However, the script doesn’t like -s .. so either give the
full path or you can use -s $(realpath ..) to normalise the parent directory
path.
|
Step 2 - Create a tagfile set
We need to copy the Slackware package series tagfiles, modify them to only include our minimal set of packages, and make them accessible to the USB installer.
I explored a variety of methods for copying the tagfiles in a separate article — Making a copy of the Slackware tagfiles.
Using the get_tagfiles.sh script, it is simply a matter of:
sh get_tagfiles.sh \
  --from https://mirrors.slackware.com/slackware/slackware-current \
  --to slackware.eeepc
Change the --from option to point to your preferred repository or a local
mirror.
We end up with a tagfile set directory structure like the following.
slackware.eeepc/
  a/
    tagfile
  ap/
    tagfile
  d/
    tagfile
  e/
    tagfile
  ...
The tagfiles will have the default tag values for each package (ADD, SKP,
REC or OPT).
Step 3 - Apply the minimal template to the tagfile set
Use the template_to_tagfile.sh script to apply the minimal.template to the
slackware.eeepc tagfile set. This will configure the tagfile set so that
only those packages listed in the template have the ADD tag and all other
packages have the SKP tag.
sh template_to_tagfile.sh minimal.template slackware.eeepc
Once the tagfile set is configured, we can check the installation size using
the calc_install_size.sh script and its accompanying pkg_size_list.awk
script. This requires a local copy of the 32-bit Slackware’s PACKAGES.TXT
file.
sh calc_install_size.sh -p PACKAGES.TXT slackware.eeepc
In my case, this reported I was installing 100 out of 1712 packages for a total install size of 1.10GB.
Step 4 - Copy the configured tagfile set to USB installer
The simplest method is to copy the slackware.eeepc directory to the root of
the mounted USB drive so that the tagpath prompt mode can be used and the
tagpath value will be /usb-stick/slackware.eeepc. This assumes the USB
drive has been chosen as the source media so that it is mounted by the
installer at /usb-stick.
The alternative is the custom prompt mode that requires copying the modified
tagfiles into the slackware-current/slackware/ directory on the USB
installer. This can be done using the copy_custom.sh script. If the USB
installer has been mounted at /run/media/gsl/SLACK32 then to install the
modified tagfiles as tagfile.eeepc in the slackware/ packages directory,
use the following:
sh copy_custom.sh -f slackware.eeepc -t /run/media/gsl/SLACK32/slackware-current eeepc
|
Note
|
According to the Slackware installer’s custom prompt mode, the custom
tagfile extension/suffix "must be a valid MS-DOS format file extension
consisting of a period followed by three characters". However, it appears to
work fine with a suffix longer than three characters.
|
Installing
Booting
Power on the Eee PC with the USB installer attached and press <ESC> at the
BIOS screen to get the boot device selection menu. Choose our USB device (not
the SiliconMotion HDD) and the Slackware installer will run using syslinux.
The Eee PC CPU is in the old Pentium-M (Celeron-M) class that does not support
PAE (Physical Address Extension). If you proceed at the boot: prompt
without entering any parameters, the installer will fail with "WARNING: PAE
disabled". As explained on the boot: prompt screen, the work-around for
this is to pass the forcepae parameter.
boot: generic.s forcepae
|
Note
|
The forcepae parameter is necessary to boot the Slackware installer on
the Eee PC but does not appear to be necessary to boot the system after
installation is complete.
|
Partitioning
Once the installer has finished booting and we are logged in as root,
partition the /dev/sda SSD using a MBR partition table. The next question
is do we create a swap partition? As Slackware-current (15.1) now uses zram
for swap, we can probably get away without it but I want to try out hibernate
(suspend to disk) so, using cfdisk /dev/sda, I allocate 512MB to a swap
partition (/dev/sda1) and the rest (3.2GB) to the root partition
(/dev/sda2).
Setup - swap & root partition
We can now run the setup process. The only "trick" is we want to install
our packages to the btrfs-formatted root partition with compression enabled.
The first pass through setup involved:
-
Run
setup. -
Do
ADDSWAPto setup the swap partition (/dev/sda1). -
Continue to
TARGETaka "Set up your target partitions". -
Choose
/dev/sda2as the root partition, choose "Format" and choose "btrfs" as the filesystem type. -
Cancel all the way out of the
setupprocess back to the console prompt.
If we run mount, it shows the btrfs-formatted root partition mounted at
/mnt.
/dev/sda2 on /mnt type btrfs (rw,relatime,space_cache=v2,subvolid=5,subvol=/)
Now unmount and remount /dev/sda2 with compression enabled.
umount /dev/sda2
mount -t btrfs -o defaults,compress=zstd:3 /dev/sda2 /mnt
Now if we re-run mount, it is reported as:
/dev/sda2 on /mnt type btrfs (rw,relatime,compress=zstd:3,space_cache=v2,subvolid=5,subvol=/)
Start the setup process again. We have to repeat the ADDSWAP step and
continue to the TARGET step where we selected /dev/sda2 as the root
partition again but this time at the "FORMAT PARTITION" screen, choose "No" so
we keep our prepared and mounted partition. Note that the /etc/fstab entry
that the installer writes for the root partition does not include our
compression option so after setup is complete, we need to remember to fix
this.
Setup - Source media & packages
The next step is the "SOURCE MEDIA SELECTION" screen where we choose Option 2
"Install from a Slackware USB stick". Once the installer locates and mounts
the USB drive, if we change to the second console (<Alt-F2>) we can confirm
the USB drive is now mounted at /usb-stick and our tagfiles are, as
expected, at /usb-stick/slackware.eeepc.
The next step is the "PACKAGE SERIES SELECTION" screen. As we are installing
using tagfiles, we can just leave all package series selected here but it
doesn’t hurt to explicitly exclude those package series we aren’t using. The
installer still spends time checking the package series tagfile for
packages with the ADD tag which can slow things down for the series with
lots of packages like kde.
We can double-check which tagfiles in our slackware.eeepc tagfile set
contain the ADD tag. Make sure to include the package series containing
these tagfiles.
# find slackware.eeepc -name tagfile | xargs grep -l ADD
slackware.eeepc/ap/tagfile
slackware.eeepc/a/tagfile
slackware.eeepc/n/tagfile
slackware.eeepc/l/tagfile
slackware.eeepc/d/tagfile
Setup - Install using tagfiles
The next step is the "SELECT PROMPTING MODE" screen. Normally, I would just
choose terse and install everything based on the selected package series.
In this case, we want to use our tagfiles so choose either custom or
tagpath.
If we have copied our tagfiles to a separate directory on the USB stick, use
the tagpath mode and enter the path to our tagfile set:
/usb-stick/slackware.eeepc
If we have copied our tagfiles into the slackware-current package directories
with a custom suffix, choose the custom mode and enter the suffix including
the leading period, for example, ".eeepc". Note that, despite the
instructions on the "custom" screen, using a suffix longer than three
characters works fine.
Setup - The rest
As we haven’t included the syslinux package, the installer fails to offer
the option to create the USB boot stick. That’s OK.
Configure the network. We haven’t installed the NetworkManager package so
configure using either a static IP or DHCP.
Choose which services to enable on start-up. There aren’t many to choose from. Select the clock and timezone.
Choose the default ex/vi editor. We have only installed elvis and vim so
don’t choose nvi.
Set a root password, or not, according to your preference.
System configuration is now complete so we can exit the installer. We still have some post-installation stuff to do so choose the "Shell" option instead of "Reboot" or "Power Off".
Interestingly, with btrfs compression enabled on the root partition, df only
reports the root partition as using 550MB instead of the projected 1.1GB.
What the actual used and free space is on a btrfs filesystem, I don’t really
know. We can get more information using btrfs filesystem usage / later.
Setup - Finishing up
To finish up before rebooting, chroot into the /mnt directory which is still
the root of the newly-installed system.
We need to ensure the root partition continues to be mounted with compression
enabled so edit /etc/fstab and add compress=zstd:3 to the /dev/sda2
options.
/dev/sda1  swap  swap   defaults                  0  0
/dev/sda2  /     btrfs  defaults,compress=zstd:3  1  1
...
The latest Slackware installer sets up the kernel for you with grub as the
bootloader. If we look in /boot there exists an initrd corresponding to
the installed kernel and checking /etc/grub/grub.cfg shows entries for the
kernel images in /boot.
The Eee PC is a pre-UEFI device so needs the grub bootloader in the MBR of
/dev/sda. I am not 100% sure if the Slackware installer does this. I have
already installed Slackware on the Eee PC a few times so the bootloader
was already in place. If in doubt, you can run grub-install anyway.
grub-install --target=i386-pc /dev/sda
I also like to clean up the grub.cfg by disabling unnecessary menu entries.
cd /etc/grub.d
chmod -x 20_linux_xen 30_os-prober 30_uefi-firmware
update-grub
We could also enable hibernate at this stage, before calling update-grub, by
setting the resume kernel parameter. I cover this below in the
post-install section.
I should also note that, while the forcepae kernel parameter was needed to
boot the installer, it is not needed for the installed kernel.
At this point, it is safe to exit the chroot environment, remove the USB stick and reboot the Eee PC.
Post-installation observations
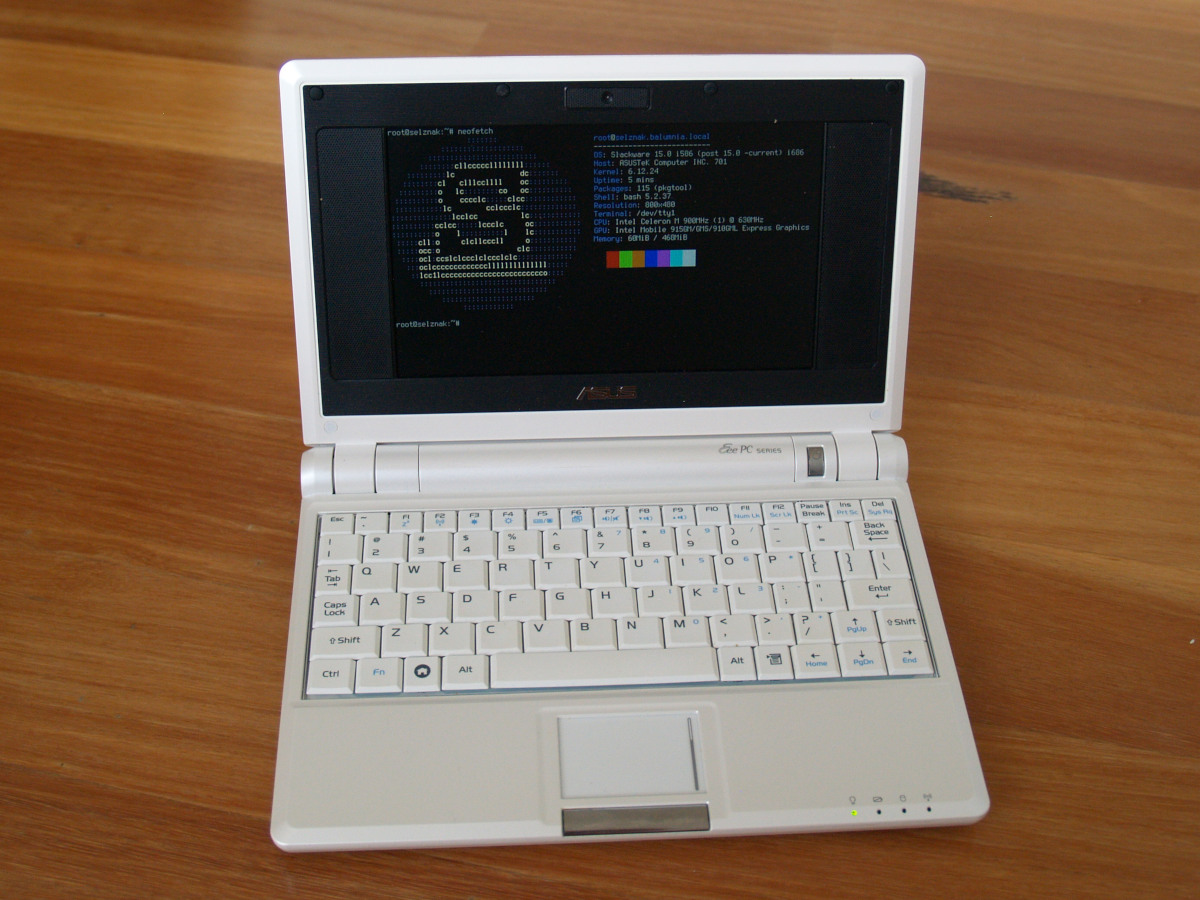
Et voilà!
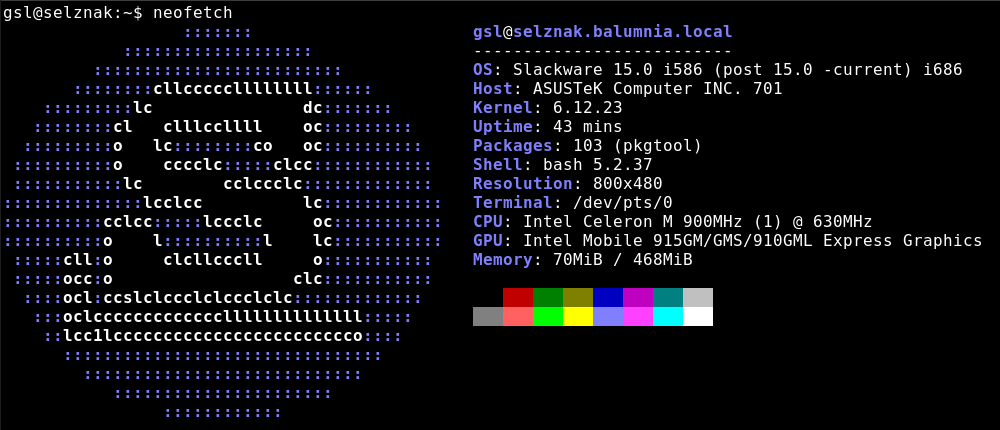
I have installed a few extra packages (via slackpkg) such as neofetch
(obviously), bsd-games (for fortune and others), nethack, lm_sensors,
ntp and its dependency, libevent.
To view man pages requires man-db (2.7M), libseccomp (410K) and groff
(10M).
Because I am living in the console, for a better experience I installed kbd
(4.1M) and ran setconsolefont to use the "Lat2-Terminus16" font. If I want
a font larger than 8x16, I can install the terminus-fonts package (4M) as
well.
Suspend & hibernate
The Eee PC will sleep when the lid is closed but requires the power button to
be pressed to awaken. Using loginctl suspend or <Fn-F1> also works to
suspend with power button to wake.
It does not appear the "LID" button is recognised as a wakeup source as it
is not listed in /proc/acpi/wakeup, only "SLPB" (Sleep Button), and there
is nothing in the limited Eee PC BIOS about wake from suspend events.
Out of the box, hibernate (suspend-to-disk) does not work — loginctl hibernate does nothing. In order to enable hibernate, the resume
kernel parameter needs to be set to the swap partition (/dev/sda1). The
steps are:
-
Edit
/etc/default/grub -
Set
GRUB_CMDLINE_LINUX="resume=/dev/sda1" -
Rebuild
grub.cfgby runningupdate-grub - Reboot
Now running loginctl hibernate will suspend to disk and the power button
will "unfreeze" from the hibernated state.
Wireless networking
The Eee PC has a Qualcomm Atheros AR242x / AR542x Wireless Network Adapter
using the ath5k driver. It is an 802.11b/g device using the 2.4 GHz band.
The wireless device can be toggled on and off using the <Fn-F2> key.
The simplest way to get wifi working is probably using NetworkManager and
its nmcli and nmtui command-line/console tools. However, to start with, I
tested with the basic wireless_tools package. Additional packages installed
were:
-
wireless_tools(550K) -
wireless-regdb(130K) -
wpa_supplicant(4.4M) -
iw(310K)
The wireless-regdb regulatory compliance database package isn’t strictly
required but doesn’t hurt to include.
The iw package provides the "newer" wireless tools which aren’t strictly
needed either but can be useful to have for testing. For instance, in the
case of the Eee PC, the new method of iw wlan0 scan provides better
information about available access points than the old method of iwlist wlan0
scanning which returns lots of "IE: Unknown" values.
To configure Slackware to connect wlan0 to a known access point at start up,
edit the /etc/rc.d/rc.inet1.conf file and configure the 2nd interface to
apply to wlan0. The IFNAME[1]="wlan0" line has to be added to specify the
interface name instead of the default of eth1.
IFNAME[1]="wlan0"
IPADDRS[1]=""
USE_DHCP[1]="yes"
WLAN_ESSID[1]="my_essid"
WLAN_WPA[1]="wpa_supplicant"
For a modern wireless device, the authentication settings would also be placed
here using the WLAN_IWPRIV[1] option. For example:
WLAN_IWPRIV[1]="set AuthMode=WPAPSK | set EncrypType=TKIP | set WPAPSK=96389..."
This would configure the wlan0 wireless interface using the iwpriv
command, in the above example by making three separate iwpriv wlan0 set
calls. This requires the wireless device supports private iotctl commands
which is not the case for the Eee PC’s Atheros wireless adapter, at least
with the default Linux driver.
# iwpriv wlan0
wlan0     no private ioctls.
In order to provide the authentication settings on wlan0 for the "my_essid"
access point, append the authentication settings to the
/etc/wpa_supplicant.conf file using wpa_passphrase.
wpa_passphrase my_essid my_password >> /etc/wpa_supplicant.conf
ctrl_interface=/var/run/wpa_supplicant
ctrl_interface_group=root
network={
  ssid="my_essid"
  #psk="my_password"
  psk=cd7340b53479a6e9d96a136fd9ce636ce2c8a9d583eed5e27ac836af3ff17446
}
The wireless interface can now be started and stopped using
rc.inet1 wlan0_start and rc.inet1 wlan0_stop. If the wireless interface
is turned off via <Fn-F2> then at boot the wlan0 device won’t exist. To
switch to wireless networking, I can:
-
Turn on the
wlan0interface with<Fn-F2>, -
Take down the wired interface with
rc.inet1 eth0_stop, and -
Bring up the wireless interface with
rc.inet1 wlan0_start.
Other stuff…
Things to investigate eventually:
- Sound
- Camera
- NFS
- X
- ?
CMOS battery replacement
At nearly 20 years old, the Eee PC’s main battery is pretty degraded (even though it reports 100% condition) and the CMOS battery was dead. This means the BIOS would reset once the main battery had drained and I would have to fix the date on boot. I decided the give replacing the CMOS battery a try.
I obtained a replacement laptop CR2032 CMOS battery of Ebay. It uses a standard 2-wire Molex connector.
Reaching the CMOS battery is not a simple affair as, while the plug is on the top side of the motherboard (to the right of trackpad), the battery itself is taped to the underside of the motherboard. Furthermore, the case does not come apart freely — opening it up will effectively snap some fine push-fit plastic pins that will not go back together firmly.
The battery replacement procedure is as follows:
- Remove the main battery.
- Remove the 6 screws around the edge of the base of the case: 2 near the hinges, 4 along the front edge. You don’t need to remove the screws from the panel that gives access to the RAM.
- Pop the keyboard tray out, releasing the clips near the top of the keyboard first. This is quite delicate and the metal tray holding the keyboard is rather flimsy.
- Disconnect the keyboard ribbon cable from the motherboard. You first need to push the black latches up/back from the socket on the motherboard to free the cable.
- Pull the trackpad ribbon cable out of its socket on the motherboard. This is a simple connection without locking but quite fiddly.
- Remove the 9 screws found beneath the keyboard that hold the heatsink part of the top of the case to the motherboard.
- Now you can separate the top of the case (containing the trackpad) from the bottom of the case. No easy way to do this, I found. There are fine plastic pins holding the two halves together and once separated, they won’t go back with the same firmness of fit.
- With the top of the case off, you can access the motherboard. The battery is at the front-right corner with the plug on the top and the battery taped underneath.
- Gently work the front and side edges of the motherboard up out of the bottom of the case so that you can access the underside. The back edge of the motherboard remains attached to the screen, case fan, power button, and battery.
- Remove the old battery and install the new one.
- Put everything back together again and hope it works.
I found that the top of the case would not fit together firmly when pushed together but once I had put the screws back into the bottom of the case, it was mostly fine with only the thin sections on either side of the keyboard (where there are no screws) having a bit of flex.
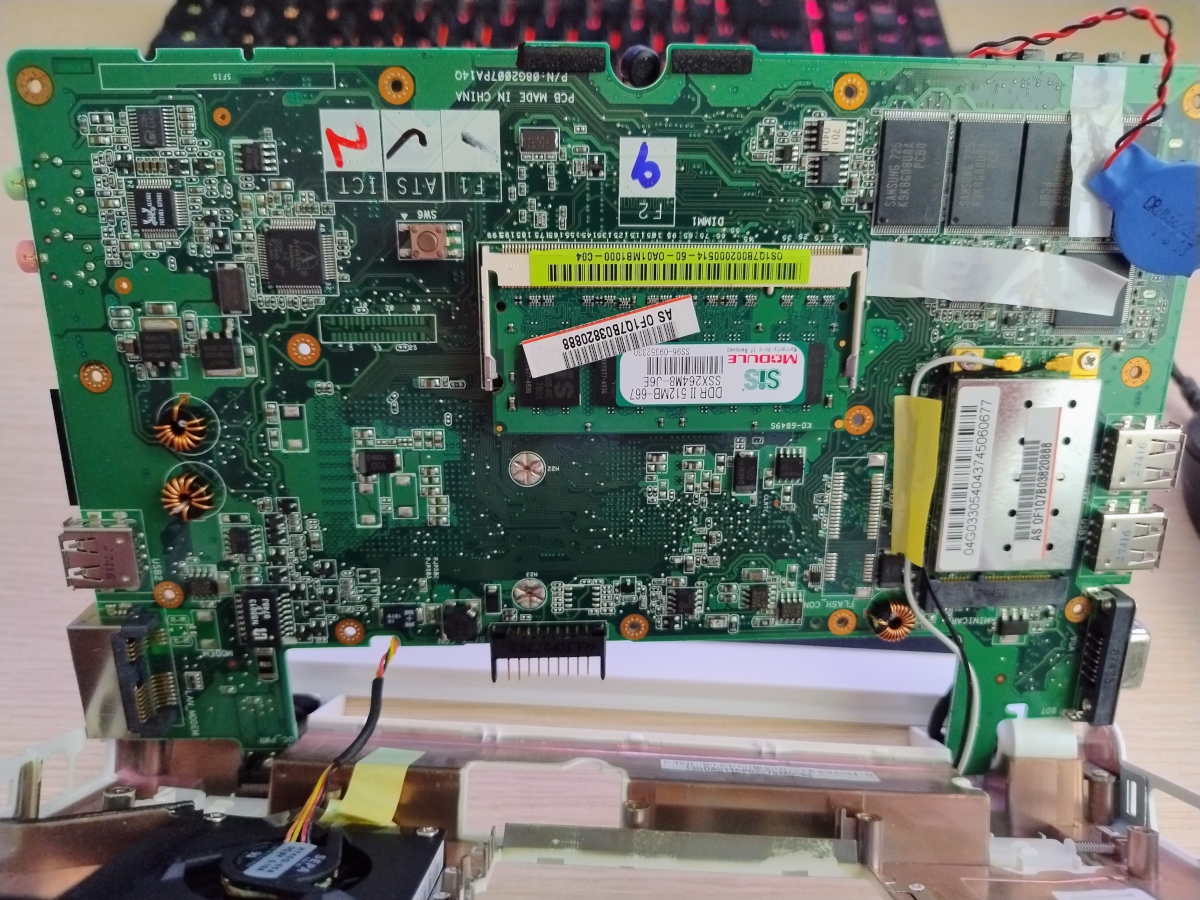
The following photo shows the underside of the motherboard with the battery location at the top-right. The battery and wires had been secured with the two pieces of white tape. Other points of interest: the single 512MB DIMM in the centre; beneath the DIMM is the unpopulated space for an SSD of some sort; and at right, below the battery, is the WiFi module.
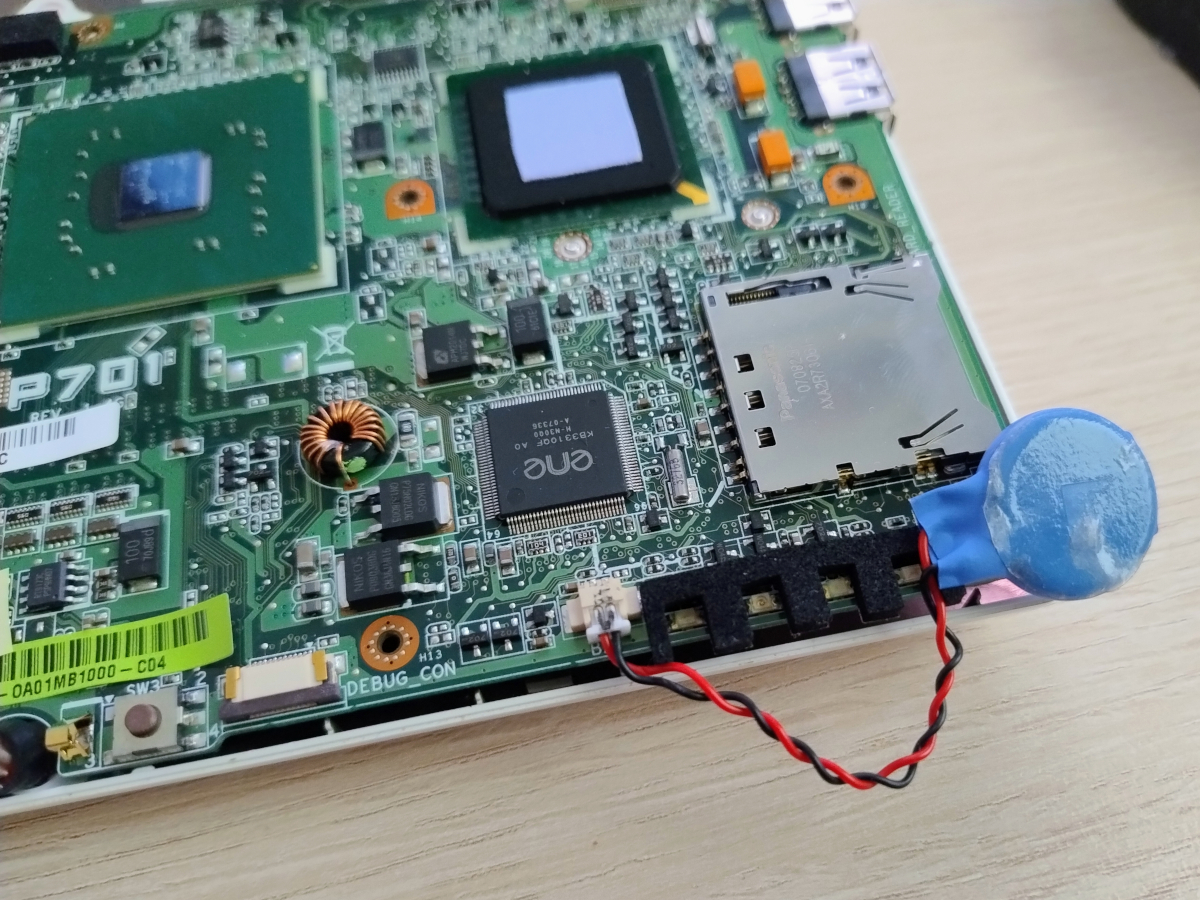
The following photo shows the top side of the motherboard with the battery detached from the underside but still plugged in to the left of the LEDs which are shielded from each other by a piece of crenellated black foam. Above the LEDs is the SD card slot.